One of the challenges we hear from many companies is that they know they need a company blog to help address some of their challenges like boosting traffic or lead generation, but they are unsure about how to start or plan a blog. We also hear from companies that have a blog that they are struggling with it and that it's not getting the results that they thought it would, and they don't know why.
Without a company blog you will lose out on the many benefits including opportunities for ranking, extending your reach on social media, building brand awareness, generating inbound leads and customers.
This post will provide some tips to get you thinking and will then take you through the key 10 steps to writing an optimized blog post.
So use this post to help you get started and if you already have a company blog then check to make sure your including these steps for best results.
Ready to get started?
Important Tips Before You Start
Tip 1: Write Posts for your Buyer Personas
The main purpose of a blog is to educate and help your buyer personas at each stage of the buyers journey. Have a strategy in place and plan content that they are going to find helpful. If you do that then you will successfully attract the audience you want and be able to move them further along the buyers journey towards a sale without wasting time on visitors who don't need or want your product or services.
If you havent well defined buyer personas then the following resources will help you get started:
- How to Build a Solid Foundation for Marketing Success
- Sharpen your Marketing Campaigns by Following the Buyers Journey
- Guide to Creating Buyer Personas [Plus Free Template]
Tip 2: Start with a SMART Goal
Before you start you need to set some S.M.A.R.T goals for your company blog.
S - Specific
M - Measurable
A - Attainable
R - Realistic
T - Timebound
You need to have a plan and set measurable goals that you want to achieve and can measure results against.
e.g. Goal is to write two blog posts a month for the 'Joe Bloggs' persona at the 'Awareness Stage' of the buyer's journey that increases traffic by 15%
Unless you have S.M.A.R.T. goals you won't be able to measure the success of your blog so take some time to put a plan and goals in place for your blog and individual campaigns which you can track.
(If you need help with goal setting or defining your personas you can contact us for a Free Inbound Marketing Assessment where we can review your current goals and marketing campaigns and make some recommendations.)
Tip 3: Be Consistent with Your Publishing
Do you ever find yourself visiting a company's blog on particular days of the week? Well I do - for example - every Friday I visit the Moz site to watch the latest 'Whiteboard Friday'. So chances are, if you do it, then so do other people. Try and plan out what days you will publish new content and try and stick to it as much as possible so that your blog readers aren't disappointed! If you have your blogs written in advance you can use a scheduling tool to post them automatically on particular days to ensure consistency.
The 10 Steps to Writing an Optimized Blog Post
If you are writing a company blog then you need a solid process in place to ensure each blog post is fully optimized to ensure it is successful. Follow these 10 steps to optimize your blog post to get better results:
Step 1 - Pick Your Topic & Working Title (One per post)
Your blog is not for writing about you. It's for writing educational helpful content that answers questions and helps readers solve problems that they are researching online.
If you are writing blogs to promote a content offer (campaign), make a list of relevant blog topics and working titles when planning the campaign. By doing this, you can plan your blog schedule in advance.
Refer to your personas and ask yourself questions like
- What are the most frequently asked questions?
- What do your buyer personas need help with?
- What do you wish people knew about your industry?
- What are industry bloggers, social media and your competitors talking about?
Step 2 - Research and Pick Your Keywords
You must do keyword research before writing your blog post to give yourself a chance to rank in search results. One of the biggest benefits of blogging is the SEO impact, so research keywords your buyer personas would use. So take your topic and a working title and start researching.
Use long tail keywords and pick low-difficulty ones if possible to give you more of a chance to rank for them.
The more specific your keywords are, the better the quality of traffic and the higher the chances of a visitor converting into a lead or a customer.
For example, if you want to target marathon runners looking for shoes then choosing "running shoes for marathons" or "running shoes for long-distance running" would be good long-tail keywords to use instead of just using "running shoes".
So make sure you use long tail keywords so you have a better chance of ranking for them.
According to SEOmoz, "long tail search comprises 70% of search traffic"
Step 3 - Pick Your Title
Now that you have selected your keywords, you can decide on a title.
- Your title must include your long-tail keywords in a way that makes sense.
- Make sure the value of the post is clear from the title.
- Keep your title between 50-60 characters. Do not go over 60, or it will be truncated in search results.
Step 4 - Write the Content for the Post
The first few paragraphs of your post are critical. You need to make it compelling so that your reader continues to read the full post. You need to grab your reader's attention with tactics like including relevant and interesting statistics or maybe a story.
Make sure you let your reader know the purpose of the blog. The title should be very clear, but you must let them know what it's all about in the first couple of paragraphs.
Your readers are looking for answers to problems, so let them briefly how the post will help them too.
Step 5 - Format your Post
It's very important to write a well-organised and easy-to-read/consume post. Follow these basic guidelines when formatting your blog:
- Use section headers, and numbered or bulleted lists to highlight points and make them easy to read.
- Whitespace is your best friend! Including lots of whitespace makes your blog much easier to read.
- Use Bold to highlight important information
- Place an image at the top of your post to catch your readers attention and encourage them to read on
- Include relevant images to break up your post and make it easy to consume.
Step 6 - Optimize your Post for SEO
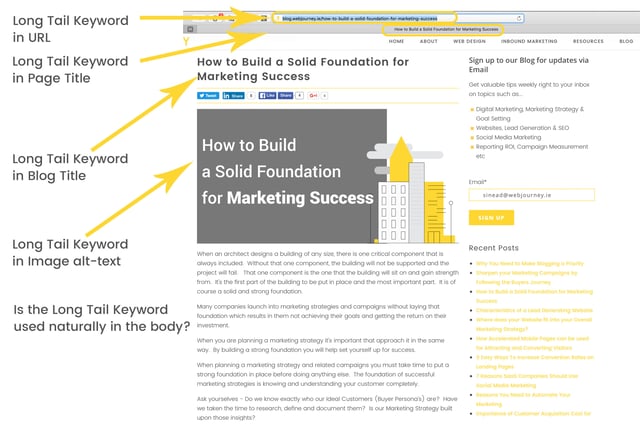
You need to ensure you optimize your post around your long tail keyword. To do this you need to:
- Include the long-tail keyword in the URL
- Include the long-tail keyword in the Page Title
- Include the long-tail keyword in the Blog Title
- Include the long-tail keyword in the Image Alt text (all images)
- Include the long-tail keyword in the body of the blog - make sure its included in a 'natural' way
- Include relevant links to other posts and content on your website as well as to other external websites (sources, examples etc.).
- Include a short summary in your meta description. Keep it between 150-160 characters so it doesnt get truncated on search results pages. Try to start your meta description with a verb, such as "Read", "Learn", or "Discover."

Step 7 - Promote Offers (Call to Action) for Lead Generation
There are 3 key ways to convert a visitor to a lead on your blog. Use these methods to help direct your visitors to take their next step once they are finished reading your post.
(i) 'Subscribe to Blog' Form
As we mentioned in our last post one of the biggest benefits of blogging is attracting traffic to your website. So when someone does visit your blog make sure there is a way for them to convert and subscribe for future updates.
Include a 'Subscribe to Blog' form (whatever you call it) on your main blog page in order to capture interested visitors and convert them into leads. If you are using a sidebar, a good place to put it is at the top where visitors can clearly see it. Some people prefer to include these in individual posts. Test and see what works.
Tip: The most you should look for is a name and email address to increase your chances of conversion.
(ii) 'Passive' CTA
If your post is long, consider including a "passive" CTA after a few paragraphs. A passive CTA is basically a highlighted link to a Landing Page with an Offer (download, free trial, assessment etc).
Under Tip 4 above you will see an example of a 'Passive' CTA in the form of a Link
(iii) Main CTA
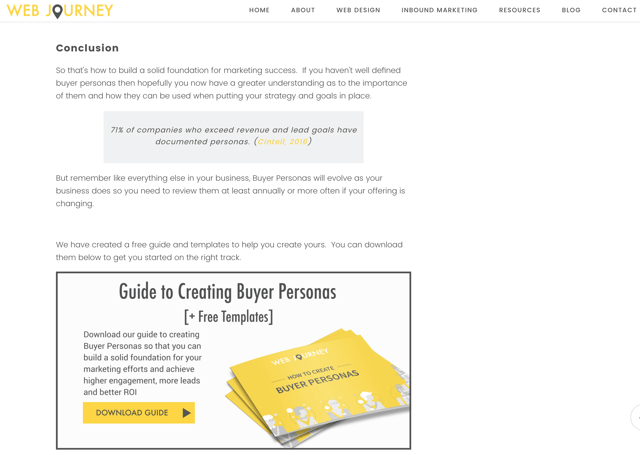
The main CTA should be included at the end of every blog post. Visual CTA's normally work best when trying to catch your readers attention.
The example below is the CTA for our own Buyer Persona Guide which is included at the end of a recent blog post.

Make sure any CTA's, passive or otherwise, that you include are relevant to the post.
Step 8 - Show Author Details
It's very important to include details of the author in the blog post (beginning or end - take your pick!). Give a face to your author by including an image of them and include a short Bio if possible. It will help connect you to your audience and readers are more likely to recognise your name or face next time they see it somewhere.
Include a link to their LinkedIn profile if they have one.
Step 9 - Make it Mobile Friendly & Speedy!
Fast loading times are critical if you want to gain new readers and keep existing ones so...
- Make sure your blog loads within a couple of seconds. Any longer than that and you will lose readers.
- Compress and optimize any images before you upload them as they are the biggest culprit for causing performance issues and slow load times.
- Make sure your blog is responsive and is readable on mobile devices as well as on desktops.
- Consider using Accelerated Mobile Pages (AMP) for your blog. For more information on AMP see our post How Accelerated Mobile Pages can be used for Attracting and Converting Visitors.
Step 10 - Promote Your Blog
There's little point in blogging unless you promote it well.
- Start by using your website to promote your blog by including a menu option in the primary navigation on your website. Don't hide it away in your footer.
- Link to other relevant blog posts from within each one to give your readers additional help.
- Include Social Share options on your blog posts. These are essential and increase click-through rates by over 50%. If your blog posts are informative and helpful, then people will share them among their own networks.
- Use your email list to promote your blog. Consider sending a weekly or monthly update and including new posts in a newsletter.
- Most importantly, share your posts on the social media channels where your buyer personas are most active. For the likes of Twitter make sure you promote your blog a number of times to get the maximum exposure.
Key Takeaways
You spend a lot of time writing the content for your blogs so make sure they are fully optimized to reach the right audience and fully engage them. Follow these 10 steps to maximize results:
- Step 1 - Pick Your Topic & Working Title (One per post)
- Step 2 - Research and Pick Your Keywords
- Step 3 - Pick Your Title
- Step 4 - Write the Content for the Post
- Step 5 - Format your Post
- Step 6 - Optimize your Post for SEO
- Step 7 - Promote Offers (Call to Action) for Lead Generation
- Step 8 - Show Author Details
- Step 9 - Make it Mobile Friendly & Speedy!
- Step 10 - Promote Your Blog
I hope you found this post helpful and use these tips to improve your blog or start a new one. Feel free to contact me if you need any further advice on the benefits of blogging and how to go about it.
In the meantime if you would like a FREE review of your current digital marketing efforts and some tips on where you should be focusing your attention why not sign up for our Free Inbound Marketing Assessment by clicking below.


